Monday, January 21, 2013

It's All In The Dirt

There are a few things that I have learned in gardening and the one major lesson is that not all soil is created equal and that the more you put into improving your soil the better off you will be all the way around. I'm going to tell you that this is going to probably be the most expensive part of gardening, it certainly was for me, however you will reep the rewards in by vegetables that are big and beautiful, without all the added checmicles and fertilizers needed for poor soil.

I chose to use the raised bed gardening method because of the sandy nutrient poor Florida soil. For me it made more sense to start with new soil Right from the very beginning instead of giving myself a migraine with amending the soil and then just ripping it out in the end anyway as I've been known to do. To fight the rocks shale and attempting to amend what I already had.

I have read the book "All New Square Foot Gardening" by Mel Bartholomew, and have taken his suggestions for his soil "recipe" and made some adjustments and additions of my own, based upon local availablity of some of the components required for the compost, along wtih the addition of the two types of peat moss.  I would recommend anyone getting into vegetable gardening  to read this book, it's a must have and offers so many insightful tips and information.

Here is a list of the componets of the soil in my raised beds.  I had some local purchases, and some I had to drive to Arcadia, FL to get.  If you find any of these closer, or cheaper, please feel free to leave me a message or post.  I would LOVE to share and collaborate on any ideas you may have. 

Math 101 to calculate how much soil you will need:

Multiply the widths of your box, and divide it by 2 to figure out how much volume your 6" deep box will hold:

(4 X 4) / 2 = 8 cubic feet
(4 X 8) / 2 = 16 cubic feet
(4 X 12) / 2 = 24 cubic feet
(4 X 16) / 2 = 32 cubic feet

Do not go by weight!!!! 

Soil For a 4' x 8' x 6" (16 sq ft.) raised bed

 Shopping List:

1/3 Coarse Vermiculite

1/3 Sphagnum Peat Moss (if available ½ brown peat moss, and ½black peat moss)

1/3 Compost (Must be a blend of 5 or more different composts-listed below). 


Compost Mix:

Hen Manure

Organic Manure Compost

Mushroom Compost

Green Planit Compost

Worm Castings

(Optional Additions)

Black Cow- Manure

Very well aged horse manure (at least 8 months or longer)

Homemade compost - Stuff from your own garden is an excellent source of compost


Purchases made:

Hen Manure, Spagnum Peat Moss, Coarse Vermiculite from: Smith's Ranch & Garden in Arcadia Fl (Coarse Vermiculite is approximately $25 for the large bag,Peat Moss large bag approx. $25, Hen Manure – Approx. $9 for 1 cubic ft. bag).

Mushroom Compost – MRT (Ace Hardware)  (Approximately $8.95 a 1 cubic ft.bag)

Organic manure compost – The Home Depot (Approximately $2.65 a 1cubic ft. bag)

Worm Castings – Lowes

Green Planit Compost – Green Planit Recycling $20 for 1 cubic yard (it’s a LOT) bring a truck!
Smith's Ranch & Garden Inc.      Sphagnum Peat Moss - $25 large bale
117 West Magnolia Street                  Hen Manure - $9 per 1 cubic yard bag
Arcadia, FL  34266                               Course Vermiculite - $35 large bag
(863)-494-2142

Green Planit Recycling                        Compost - $20 per 1 yard.
4694 Duncan Rd.
Punta Gorda, FL  33982
(941)-637-6053

Green Leaf Worm Farm                      Worm Castings: Many different sizes.  Example:  1lb Bag - $8
North Port, FL                                                                                                                     5lb Bag - $12
http://www.greenleafwormfarm.com/


Sunday, January 6, 2013

End of a Great Fall Garden

Well I hope everyone had a great Holiday, however it's time to get busy in the garden again.

I can tell that my fall garden is almost finished for the season. I've harvested almost all of the cabbage, carrots, and tomatoes but because of the 80 degree weather we've had lately my lettuce has begun to bolt. However I think that all things considered I've had a pretty good first crop.  I've started another batch of broccoli, but I think I'm a bit late, even though they were put out the end of December the weather has been just too warm.


However, I think I've had a pretty good harvest for my first real garden.  I've made several batches of freezer pickles, salsa, and pepper jelly and have plans for a lot more canning ahead for the spring crop.

I will be posting some of my recipes here for you to enjoy soon.


So, on this vain, I've made some purchases for the spring garden which I hope to begin planting either mid February or at the very latest first week of March.  These by the way were all the recommended varieties from the UF website, and from local growers suggestions.  I did purchase seeds from two places this year Johnnyseeds.com and from a local store Smith's Ranch and Garden in Arcadia FL.  They have a great selection of new seeds for the season, and sell them by weight.  I purchased 1/4 ounce seeds, because I wanted to give them a try first.  According to them, these seeds have a 85-95% germination rate.

I'm going to start putting some of these in pots tomorrow (I know I'm a little late) however I've been extremely busy with family, and the holiday's and just haven't had the time to get to them.  I did however get a Worm Factory 360 for Christmas, and will be making some posts with regards to my progress with this.

As you've probably noticed, I have only chosen the indeterminate variety of tomatoes this year because I want to really focus on the vertical growing method and the bush tomatoes just get too leggy and take over the small raised bed space.  I'm also going to focus on growing the beans, cucumbers, and peas on the trellises as well.

I'll keep you posted on how the plants make out.

This is the Johnnyseeds selection:


Fortex-Packet
Vegetables > Beans > Beans, Pole > Round Pod


Slick Pik® YS 26 (F1)-Packet
Vegetables > Squash > Summer > Yellow


Excelsior (F1) (OG)-Packet
Vegetables > Cucumbers > American Pickling


Peppino (F1)-Packet
Vegetables > Peppers > Hot Specialty Peppers


Jalafuego (F1)-Packet
Vegetables > Peppers > Hot Southwestern Peppers > JalapeƱos


Juliet (F1)-Packet
Vegetables > Tomatoes > Saladette and Sauce > Indeterminate


Red Pearl (OG)-Packet
Vegetables > Tomatoes > Grape


Smith's Ranch and Garden Seeds:

Kentucky Wonder - Pole Bean

Alaska Snow Pea

Blue Lake - Bush Beans

Beefsteak - Tomato (Indeterminate)

California Wonder - Bell Pepper

Serrano Chili

Roma - Tomato (Indeterminate)

Poinsett - Cucumbers 


Crimson Sweet-Packet
Vegetables > Watermelon > Red Flesh

Tuesday, December 4, 2012

Pepper Jelly Time!

After harvesting my jalepeƱo peppers I wasn't quite sure what I was going to do with so many of them. After looking at several recipes I decided I was going to make some homemade jalapeno pepper jelly.

This was my very first attempt at canning and I must say it really came out very well. I enjoyed the process of cooking and canning the jelly very much. I plan on making some more and giving them away as Christmas gifts.


I boiled the jelly on the stove for 10 mins, before canning


Pepper jelly is great with cream cheese on a cracker!


Saturday, November 24, 2012

Fried green tomatoes Yummmm

I hope everyone hade a safe and happy thanksgiving. We had a great day at our house and enjoyed the most delicious sweet potato casserole ever. We used the cured sweet potatoes from the garden and it truly was a hit. I think that they have been curing now for about 3 months. 

Also, I just harvested 7 large green tomatoes and cooked them up for a Black Friday feast. Boy were they delicious. Here is to kicking off the holiday season!

.

Here is a few current photos of the garden.


The broccoli are getting bigger every day I see them, just not sure how much longer I should wait to harvest


This is some of the Buttercrunh lettuce, and it tasted so good, I just had to plant another bed of them. 


This is the additional bed of Buttercrunch Lettuce (right front), Onions (right back), Eggplant (back left), and Spring Mix salad greens (left front)


Several of my tomato plants.


Thursday, November 15, 2012

Pests and diseases


Here are a few pictures of some of the pests and diseases that have plagued my garden. I have had as many caterpillars that there probably are in Southwest Florida and have really had a problem with the mosaic virus on my cucumbers, not to mention fungal diseases on the tomatoes as well.

I have learned to control most of the pickleworms, melonworms, cutworms and tomato hornworms with BT Thuricide.  However, you really have to keep up on it on a weekly or even biweekly basis in order to keep them under control. What I've found is that an ounce of prevention is surely worth a pound of cure, and that you really need to be conscious of when you're planting your vegetables. In Southwest Florida timing is everything and if you do not time your crop correctly then you will be plagued by pests and disease.

For the most part I use insecticidal soap for control of aphids and some other soft bodied pests. Another method of control of aphids is simply take a hose and spray them off. I have found that ladybugs, although very beneficial in the garden, really are not effective in their overall control of aphids and other pests.  But they sure do help out in the garden, and look beautiful too.  Just be sure that whatever product you use, does not kill off the beneficial insects and bees.  I've learned this the hard way, when after planting some pumpkins, they would just start to grow, but then would rot and fall off the vines.  I could not figure this out, however I realized I was spraying for the melonworms (of course the wrong product) during the day, when the flower blooms were open, and the bees were active.  What I was doing was killing off the bees, and not allowing full pollination!  So there was the key to the puzzle.  First, make sure your spraying when the flowers are closed, and bee activity is at a minimum.  Second, make sure of what your spraying!  And finally, investigate what pest you are wanting to control and the correct measures for that situation.  During my pumpkin fiasco, I even reverted to using Seven dust, which of course did nothing but suffocate my leaves, and cause wilt, die off, and improper pollination, not to mention killing off my precious bees. 

Another great method to use is spraying the plants with worm compost tea. I purchase this at my local farmers market along with worm castings That are a great source of beneficial compost for the garden soil.

In my garden I have a saying, all bees, butterflies, and spiders are welcome.  Now I think I should add to that ladybugs!


Just some of the devastation in the garden, caused by three hornworms in just 2 days.
Like Waldo, Can you find the culprit?  He wasn't easy to find at first, and took my husband and I several looks in order to catch them.  Once found, they just jumped right out at you.  Sneaky little devils aren't they


Tomato Hornworm.  Ugly isn't he?


This is the telltale sign of the tomato hornworm.  It's called manure, and usually found at the base of the plant.  Almost looks like scat, but I found some on the leaves, so not scat.


Dreaded melonworm.  The bane of my existence here in SW FL!!!


You can't really see it, but there are several holes in these squash, where the pickleworms have made their home. 


Below are some picture of the black rot that affected my fall 2012 garden.  Black rot - it is caused by a bacteria which is often seed borne but can survive on crop debris - control is use of certified seed, copper sprays can help reduce spread, also avoid working plants when wet and avoid overhead irrigation.  Cut petioles should display black veins in petiole.


This is black rot on my broccoli and cabbage plants, it has even taken over the cauliflower as well.  


More of the devastating black rot.  I at least harvested the main broccoli stalks prior to it getting this bad.


This is damage from the Tomato fruit worm pictured below.  They can become quite large, and LOVE the green tomatoes.  I especially hate them because they don't seem to eat the entire tomato, just ruin them by taking bites out of them before moving to the insides.  These again are controled by Thuricide or Dipel.  I'm going to be giving Dipel Pro a try, as I am doing some further research on its advanced effectiveness.


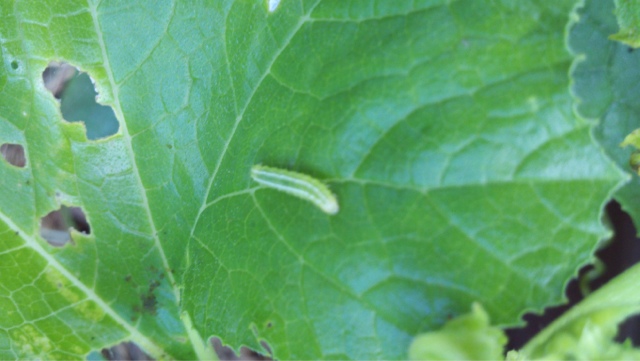
I'm not really sure what this catepillar is, however he is doing just as much damage as all the other moth born pests.  Any ideas as to his identity please give me a shout out.  I at first thought he was a cutworm, but don't think so now.  I've found him on the upper level of the tomatoes, in my green beans, on my cabbage, broccoli and bell peppers.
 
 
This is a picture of the Sri Lanka Weevil. He is new to SW Florida, and according to Ralph Mitchell - Director/Horticulture Agent for the Charlotte County Cooperative Extension Service, there are no known pesticides for vegetable crops that can control them. They chew into the leaves, as you can see below, leaving a V shape to the leaf. One method of control is hand picking (which I have done and seems to work very well) or to take a black umbrella turn it upside down and place below the plant, and give the plant a little shake. The bugs fall off the plant very easily, and into the umbrella for you to dispose of. P.S. They are crunchy little buggers, and hard to squeeze in your hand so use gloves, or your fingernail to kill squish them. You can read further about this pest by going to : http://charlotte.ifas.ufl.edu/horticulture/newsarticles/SriLankaWeevil.pdf from the Charlotte County Extention office.


Wednesday, November 14, 2012

The broccoli are coming,the broccoli are coming!

Out in my garden after three days of work and what do I find? The broccoli heads already sprouting. Yippee!! I know I sound a bit crazy, however it's my first run at growing broccoli and It gives me great satisfaction in knowing that all of our hard work is paying off.

I've noticed that I have some yellowing leaves on the base of the stalk and pulled off the more far gone leaves, hoping that's the correct thing to do.

Also I harvested some butter crunch lettuce, spinach, yellow beans, although just a small handful of those, and one lonely tomato.

What surprised me however, was that after just 3 days of not seeing my garden and two small sprinklings if rain, my tomatoes already have fungal disease on their leaves. I've picked the worst of them off, and threw them away.  Personally I don't put them in the composter because I'm afraid of spreading diseases.

I will be doing a whole page dedicated to what I've learned about pests and diseases for the SouthWest region of Florida very soon, in addition to my thoughts on what type of soil to use for raised beds.


Monday, November 12, 2012

Some of the edible vegetables and fruit from my garden

This is just some of the vegetables and fruit that I've harvested so far. I have some bell peppers, green beans cherry tomatoes and even a cantaloupe!

I harvested sweet potatoes back in September, however after some considerable reading I learned you cannot eat the sweet potatoes right out of the ground as they are virtually tasteless, so you have to cure them outside for a week and then store them for over 2 to 3 months before they become sweet enough to eat. Who knew right? Well they should be ready just in time for Thanksgiving though!  Will let you know how the sweet potato casserole turns out, and share my favorite recipe for it too.

This cantaloupe was very small, and I almost threw it in the compost bin.  It turned yellow on the vine, and as I was bringing it in the house, my husband said "your not bringing that in the house are you?" lol.  I said well yes I am, so that I could cut it open and see where I had failed or if something had gotten in it.  It was ripe and juicy and I ate it on the spot!  They are stunted though on the vine, and only about the size of a grapefruit.  I'm thinking lack of fertilizer and water may have been the culprit.


A tisket a tasket my sweet potatoes in a basket :-)


You can see the size of these sweet potatoes, they are HUGE!!  Not bad for my first time growing them.  Of course they were not all this size, and I would like to try the above ground hay method with fencing next time just to see if the yield is better, and if it saves my back from all the digging.  I'll keep you up-to-date on that one and blog all about it next spring.


Just some of the green beans, peppers and tomatoes of the garden.